Free Pattern- Marvelous Summer Beverage Cozy

“However difficult life may seem, there is always something you can do and succeed at.”

-Stephen Hawking

To skip over my babblings and jump straight to the pattern, click here.

As a crochet addict/maker of things, I have a hard time sitting down and watching movies or TV shows without a hook and yarn in hand. It seems like every time I try, my mind wanders. Within a few minutes, some small cue on screen will have inspired me to reach for my idea book… or straight for the yarns.

So, quite naturally, I considered bringing a just a little ball of yarn and a hook to the theater to keep my hands busy when we went to see Endgame earlier this month…

It’s never a matter of how much I may or may not enjoy a movie. It would definitely take more than one viewing to fully analyze the film, and the chances of me making it through without a pee break were minimal anyway… so why not bring something small and simple to chip away at and stop my hands from getting stiff in the conditioned air of the theater?

After weighing the pros and cons, I decided to leave the yarn home and try to behave like a normal person for the movie date.

After all, I really ought to pay attention so I could be prepared for the in-depth discussions I knew we would dive into the moment we exited the building.

Well, I rather enjoyed the movie! Overall, I think it was nice and neat way to close one chapter in the MCU and open the gate for the next one!

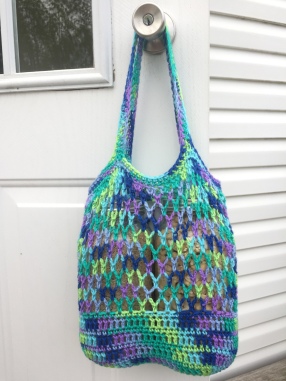
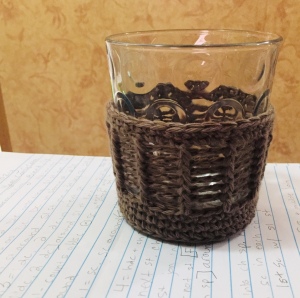
Shortly after the anger and incredulity that took hold at the manner of Ant-man’s escape from the quantum realm, some props caught my eye- little wicker cup holders!

I’ve never come across any in my wanderings, and it never occurred to me how lovely it would be to have a cozy around a glass in the summer. Cold summer beverages tend to leave a glass sweaty and slick with condensation, especially when enjoyed outdoors. Why did I not think of this before?

And I am always on the look out for small, practical projects to use up yarn scraps and help me practice pattern writing.

Crocheted with a machine wash and dryable yarn, maintenance of the cozies would be easier than wicker, considering this dusty country road I live on.

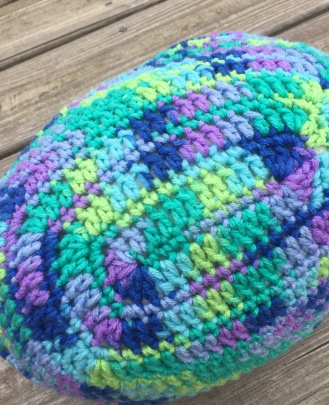
So I scooped up my cotton blend leftovers and set to work to create a simple, stylish beverage cozy that could stretch to fit a glass snugly. I also wanted a little subtle texture to make the glass easier to pick up and hold.

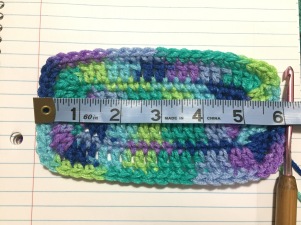
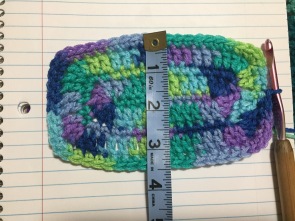
The glasses I made these for are 4″ tall with a bottom diameter 2 7/8 inches, and a top diameter of 3 1/2 inches.

You can easily accommodate a wider, narrower, taller or shorter glass by adding or subtracting rounds from the middle sections, or using a different yarn with a different sized hook. I will probably come back to this at some point as I have some matching narrower/taller glasses that won’t want to be left out of the cozy fun.

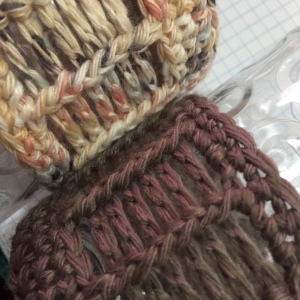
I narrowed the yarn down to Lion Brand’s comfy cotton blend. It’s a soft, 3 ply light yarn that feels a little bit thicker than most yarns I’ve used from that weight category. The mochaccino color in particular seemed evocative, with the memory of wicker fading in my mind.

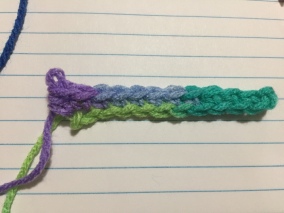
Since I had a bunch of balls between 11 and 18g, that was my target yarn amount. I tried a couple other colors out while fiddling with the design.

img_1514
LBCCB Chai Latte
And one without coaster in Stained glass- works great for my taller glasses and only 11g! 🙂

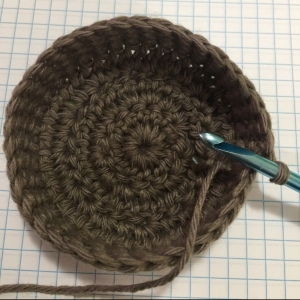
Worked from the bottom up, the coaster section is a quick, 3 round circle of DC, sealed with one round of blsc and 2 rounds of sc. The blsc sts can be swapped for regular sc if you’d prefer.

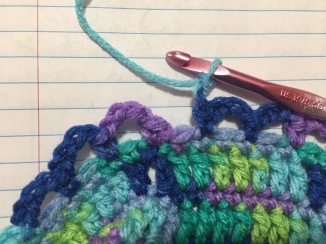
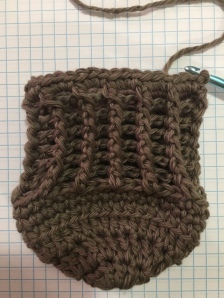
The middle section is composed of chs and FPhdcs. The chs help make the cozy stretchable and form fitting to the glass as it gradually gets wider toward the top. The middle section is great for free styling/improvising. You can basically get away with any combination of chs and sts, so long as you don’t change the st count.

It finishes nice and easy with 2 rounds of sc.

The cozy looks pretty nifty inside out, too, so no worries if someone in your household puts one on that way! 🙂

*

Marvelous Summer Beverage Cozy

Here’s what you need:

Yarn: I’m using Lion Brand Comfy cotton blend in Mochaccino: 17g for one with a built in coaster, or 11g with no coaster.

Hook: US H8/5.00mm, or hook to obtain gauge

Tapestry needle for end weaving

Measuring tape

Gauge notes: The first 3 rnds should be about the same in diameter as the bottom of the glass; slightly larger is ok. Mine is just under 3″ after rnd 3 is complete.

*US crochet terminology used throughout- scroll to the bottom of this post for abbreviations and special stitch instructions

*stitch counts are underlined at the end of each round 

The cozy:

Ch 3, sl st in the first ch to form a ring, or use a magic ring.

1. Ch 2- does not count as a st. 12 DC into the ring. Join to 1st DC with a sl st. 12 DC

Rnd 1 complete.

2. Ch 3- counts as DC. DC in same st.  2 DC in each st around. 24 DC

Rnd 2 complete.

3. Ch 3- counts as DC. 2 DC in next st. [DC, 2 DC in next st] around. Join to 3rd beg. ch with sl st. 36 DC

img_1489.jpg
Rnd 3 complete.
img_1490
At this point, your work should be slightly larger than the base of your glass.

4. Ch 1- counts as blsc.  Blsc in each st around. Join to beg. ch 1 with sl st. 36 blsc

img_1491.jpg
Work through BOTH back loops for blsc
img_1493-e1558547949357.jpg
Rnd 4 complete.

If you don’t want a built in coaster, start here with a foundation ch of 36, sl st into the 1st ch to form a ring, mindful not to twist the ch.

5-6. Ch 1- counts as sc. Sc in each st around. Join to beg. ch with sl st.

img_1494-e1558548145929.jpg
Rnds 5-6 complete. This is a good place to add an extra round or two if you’re working with a taller glass.

7. Ch 1, sc in same st as join. ch 2. [sk 2 sts, sc in the next st, ch 2] around. Sk last 2 sts, join to 2nd beg. ch with sl st. 12 sc, 12 ch sps

Rnd 7 complete- I’ve since edited this round, swapping the original hdcs for scs- the picture will reflect the change as soon as I find a wee bit of time to make another and retake the photo.

8. Ch 1- does not count as st. FPhdc on the same st as join. Ch 2. [FPhdc on the next sc, ch 2] around. Join to first FPhdc with sl st.

9-13. Ch 1- does not count as st. FPhdc on the same st as join. Ch 2. [FPhc on the next hdc, ch 2] around. Join to 1st hdc with a sl st.

At the beginning of each of these rounds, ignore the beg. ch 1 and head straight for the post.
The work will pucker slightly here- don’t worry! Just be mindful not to make your chains too tight- this section will stretch and help the cozy fit snugly around the glass. This is also a good place to add rounds if your glass is taller.

14. Sl st into ch sp. Ch 1, 3 sc in same sp. 3 sc in each ch sp around. Join to 1st sc with sl st. 36 sc

Sl st into the ch sp, ch 1, 3 sc in same sp
Rnd 14 complete.

15. Ch 1, sc in same st as join and in each st around. Fasten off and finish with an invisible join.


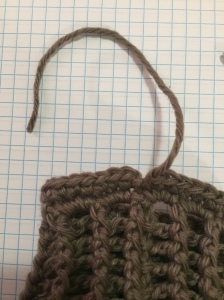
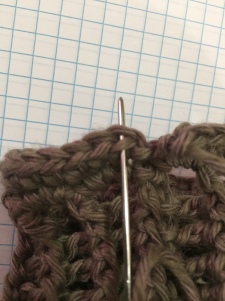
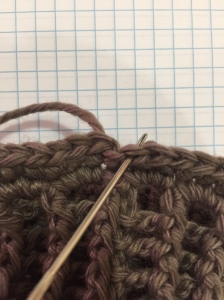
Sew in those ends and enjoy your new marvelous summer beverage cozy!

Abbreviations and Special Stitches

ch(s) = chain(s); st(s) = stitch(es); sp(s) = space(s); sl st = slip stitch; sc= single crochet; blsc = back loop single crochet; hdc = half double crochet; dc = double crochet; [ ] = work directions in brackets the number of times specified; ( ) = work the directions in the parenthesis all in one st or sp; rnd(s) = round(s)

fphdc = front post half double crochet. YO, insert hook around the post of the st indicated. Work the rest of the hdc as usual(YO, draw up a loop. YO, draw through all 3 loops on hook).

For the variation in the center, I swapped the scs in Rnd 7 for hdc, and the FPhdcs in Rnd 12 for FPDCs, then straight to the final 2 rnds as written.

Free Pattern- Mini tote

I long to accomplish a great and noble task, but it is my chief duty to accomplish small tasks as if they were great and noble.”

-Helen Keller

To skip over my babblings and jump straight to the free pattern, click here.

If you’d like an ad-free copy of this pattern that includes variations for multiple sizes, or if you’d just like to support me as a designer, consider purchasing your download for a small fee from my new Ravelry store here.

Harmony Market Tote Series, No. 1: Diamond Mesh Tote

Easy, no sew, mini, all-purpose, super durable, fantastically stretchy, solid bottomed, mesh-bodied, kid friendly market tote. 

This tote is a collection of basic stitches organized in an intuitive way, the result being a functional and durable bag that’s fun and easy to make.

It is worked in rounds from the bottom up in one piece- no assembly or sewing involved, and no excessive end weaving.

Better still, you don’t need to do much stitch counting beyond the beginning couple of steps and the handle round- visual cues are abundant. For instance, the stitch increases in the base section always land in the center of the increases from the round before- easy peasy.

They are perfect for those heavy grocery items that can too easily be overloaded into larger and less capable bags, such as canned goods.  They are very durable and can hold a good deal of weight- up to 20 lbs!


Not that the occasion to carry 20 pounds in a little handmade bag comes along very often…

With lighter contents, the bag is petite and great for kids who like to carry their own shopping bags. It would make a great little beach bag!  Machine wash and dryable= easy maintenance.


And I love a good solid bottom to prevent little things from slipping through the diamond mesh.

Sooo… on to the lil tote of many adjectives!

Mini Tote

Materials

Yarn: RHSS, shown in wildflower; approx. 170 yards/100 grams

Hook:  US I9/5.50mm, or size to obtain gauge

one stitch marker (optional)

tapestry needle, to weave in your two ends 🙂

Gauge: Gauge is not critical- mine measures 6” x 3.5” after Rnd 5 is complete.

Finished Unstretched Dimensions: About 9” long and 12.5” wide, with an opening of 21” at the top. The handles are 11″ long each. This bag can stretch a lot!

*US crochet terminology used throughout- scroll to the bottom of this post for abbreviations and special stitch instructions

*stitch counts are underlined at the end of each round

*hopefully helpful hints are in italics

Ch 12

Rnd 1. Sc in 3rd ch from hook and in next 8 chs. (sc,hdc) in last ch.  (Hdc counts as a ch 2 sp join.)           10sc, 2 ch 2 sps

Figure 1.JPG
Figure 1: Rnd 1 complete.


Rnd 2. Ch 2- does not count as st. 3 DC on the side of the hdc join.

(Do not turn, but continue to work along the bottom of the foundation chain.)

DC in 10 sts. 6 DC in the ch 2 sp.  DC in 10 sts.  3 DC on the side of the hdc join. Join with a sl st in the 1st DC made.            32 DC

Figure 2.JPG
Figure 2: The first AND last 3 DC go here, on the side of the hdc join.
Figure 3.JPG
Figure 3: Rnd 2 complete.


Rnd 3.  Ch 1- counts as sc. *3 sc in next st. Sc in 12 sts. 3 sc in next st.* Sc in 2 sts.      Repeat from * to *   Sc in last st. Join with a sl st to the beg. ch 1.              40 sc

Rnd 4. Ch 3- counts as DC. DC in next st. *3 DC in next st. DC in 14 sts. 3 DC in next st.* DC in 4 sts. Repeat from * to *   DC in 2 sts. Join to 3rd beg. ch with sl st.           48 DC

Rnd 5.  Ch 1- counts as sc.  Sc in 2 sts.  *3 sc in next st.  Sc in 16 sts. 3 sc in next st.* Sc in 6 sts. Repeat from * to *   Sc in 3 sts. Join to beg. ch 1 with a sl st.                56 sc

Figure 4.JPG

Figure 5.JPG
Figures 4 and 5: Rnd 5 complete. Gauge = 6″ x 3.5″

Rnd 6.  Ch 3- counts as DC. DC in 3 sts. *3 DC in next st. DC in 18 sts. 3 DC in next st.* DC in 8 sts.      Repeat from * to *   DC in 4 sts.  Join to 3rd beg. ch with a sl st.                 64 DC

Rnd 7. Ch 1- counts as sc.  Sc in 4 sts.  *3 sc in next st. Sc in 20 sts. 3 sc in next st.* Sc in 10 sts.    Repeat from * to *   Sc in 5 sts. Join to beg. ch 1 with a sl st.                       72 sc

Rnd 8. Ch 3- counts as DC. DC in 5 sts. *2 DC in next st. DC in 22 sts. 2 DC in next st.* DC in 12 sts.     Repeat from * to *  DC in 6 sts. Join to 3rd beg. ch with a sl st.                      76 DC

Rnd 9.  Ch 1- counts as sc. Sc in next st and in each st around. Join to beg. ch 1 with a sl st.                 76 sc

Rnd 10. Ch 3- counts as DC. DC in next st and each st around. Join to 3rd beg. ch with a sl st.                76 DC

Rnd 11.  Repeat rnd 9

Rnd 12.  Repeat rnd 10

Rnd 13.  Repeat rnd 9

Rnd 14.  Ch 1, sc in same st as join. [ch 4, sk next st, sc in next st] around to the 2nd to last st. Ch 2, sk last st, DC in the first sc of the round. The dc join counts as 2 chs and the first sc of the next rnd.         38 sc, 38 ch sps

Figure 6.JPG
Figure 6: Ch 2, skip the last st.
Figure 7.JPG
  Figure 7: DC in the first sc of the round.


Rnds 15-21.  [Ch 4, sc in the next ch sp] around to the last ch sp. Ch 2, DC in the DC of the previous round.

Figure 8.JPG

figure-9.jpg
Figures 8 and 9: At the end of each Rnd, ch 2 then DC into the DC of the previous round.

Rnd 22. Ch 3. [Sc in the next ch sp, ch 3] around. Join to the last DC of R21 with sl st.

Rnd 23. Sl st into the next ch sp. Ch 2-does not count as st. 2 DC in same sp. 2 DC in each ch sp around. Join to 1st DC with a sl st.                      76 DC

Rnd 24. Ch 1, sc in same st as join and in each st around. Join to 1st sc with a sl st. 76 sc

Handle Round


Rnd 25. Ch 1, sc in same st as join. Sc in 19 sts.

*[ch 1, turn, sc in 2 sts] 42 times, or until handle reaches desired length. If you decide to make your handle longer or shorter, just be sure to add or subtract rows evenly so you end up stitching down the correct side of your handle.

Ch 1- mark ch. Sc down the side of the handle.

Sc in 14 sts. Drop hook and line up handle.(figure 10)  Insert hook into the marked st and pull the dropped loop through. (figures 11-12)

Ch 1. [insert hook through the next st on the top of the handle and the next st of R24. YO, pull through both sts] twice. *

Ch 1. Sc in next 22 sts.

(figures 13-15) 

Repeat from * to *

Ch 1. Sc in last 2 sts. Join to 1st sc with a sl st.

Figure 10.JPG
Figure 10: Line up your handle. 


Figure 11.JPG

Figure 12.JPG
Figures 11-12: Flip the handle forward; insert hook through marked ch and pull loop through.
Figure 13.JPG
Figure 13: Sl st the handle to the body.   

Figure 14.JPG

Figure 15.JPG
Figures 14-15: Ch 1, then sc as indicated. 


Rnd 26. Ch 1, sc in same st as join. Sc in next 16 sts. This puts you one stitch before the handle begins.

*Sc2tog using the next st and 1st available space on the outer edge of the handle.

Sc along the outer edge of the handle up to the last available sp.

Sc2tog using the last available space on the handle and the 1st available sc after the handle. *

Sc in 18 sts.   Repeat from * to *

Sc in the last st.  Join with your prefered method(I like an invisible join, see remaining figures) and FO.

Sew in ends.

Figure 16.JPG    Figure 17.JPG   Figure 18.JPG   Figure 19.JPG

Stitches and Abbreviations

St(s) =stich(es);  sp(s) = space(s); ch(s) = chain(s); sc = single crochet; hdc =half double crochet; DC = double crochet; sl st =slip stitch; sc2tog= single crochet two together; [ ] = work directions in brackets the number of times specified; ( ) = work the directions in the parenthesis all in one st or sp; * * = set of instructions to be repeated later as specified; sk = skip; beg. = beginning; YO = yarn over

That’s all!

Thanks for taking the time to use my pattern! Enjoy your new bag!

Update 6/7/19: If you’d like an ad-free copy of this pattern that includes variations for multiple sizes, or if you’d just like to support me as a designer, consider purchasing your download for a small fee from  my new Ravelry store here.